Microsoft Dynamics 365 Business Central is still the new kid on the block, but is rapidly making waves. As more and more of our clients make the leap to this versatile and robust system, we have decided to publish a series of blogs on how to use Dynamics 365 Business Central. This post will detail three different methods to post an invoice to a vendor account.
To see it in action, be sure to visit (and subscribe!) to our YouTube channel!
Using the Purchase Invoice Window
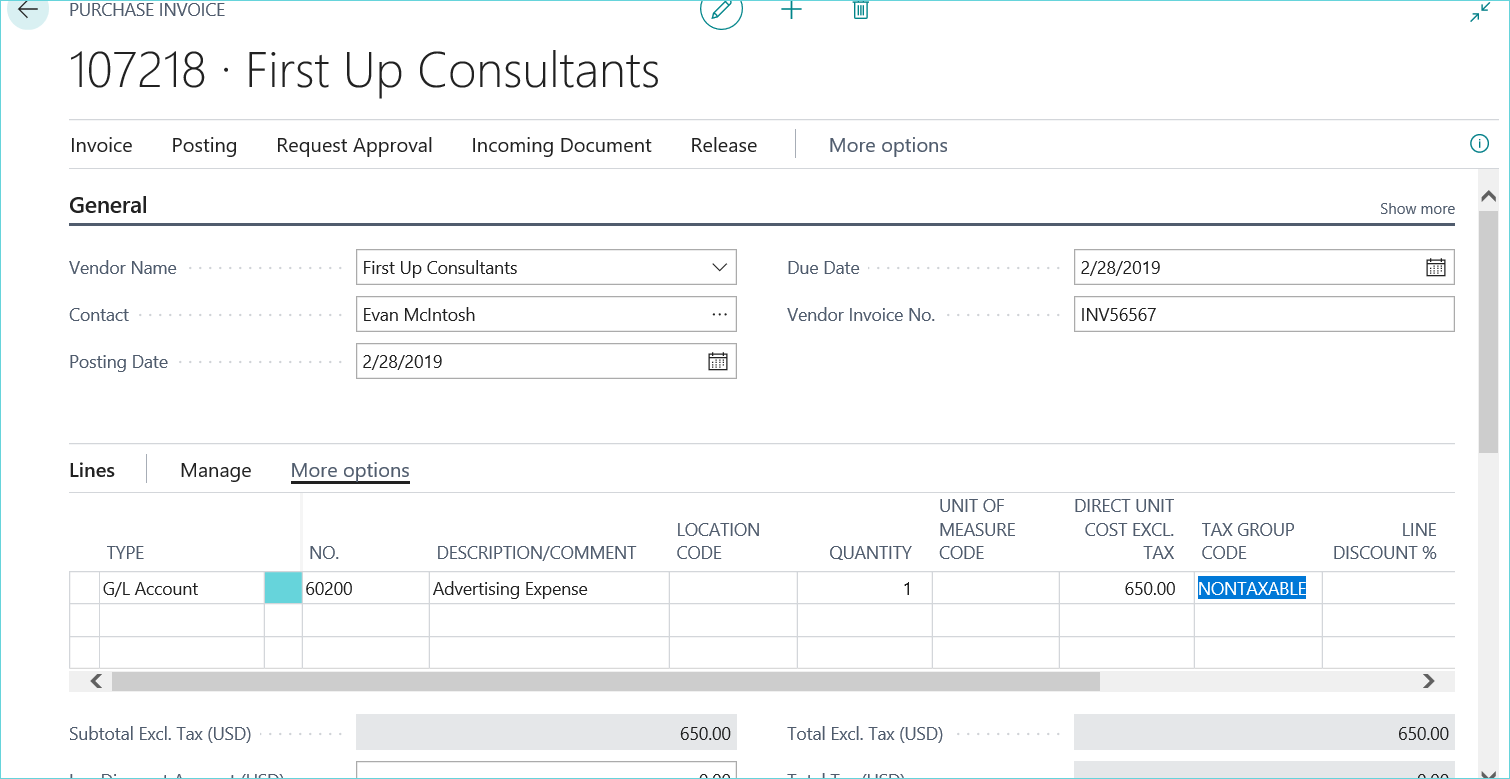
The first method provides the most detail. This method is required if using item detail but it can also be used if posting an invoice to an expense account is the only requirement:
- Go to Purchasing > Purchase Invoices > New.
- Select the Vendor and enter a Vendor Invoice No.
- The Type can be an item number or a G/L Account (if item detail isn’t necessary for this invoice).
- In this example, we will post an item to Advertising Expense.
- Enter the quantity as 1 and the cost.
- A Tax Group may also be assigned here. Enter any additional details as needed under invoice details, shipping, and payment sections.

Click Posting > Post and Print to post the invoice.
Using the Purchase Journal Window
A second method to enter a purchase invoice is through the purchase journal window. This is especially helpful if detail isn’t needed and items won’t be assigned to the invoice.
First, pull up the vendor card and go to Actions > Purchase Journal.
Enter the following information (note: the amount is positive since this is in the purchase journal window).

Select Process > Post and Print.
A debit has been made to account 60200 (advertising expense) and a credit to 20100 (accounts payable).
An open invoice has also been posted to the vendor ledger that can be selected for payment.

Using the G/L Journal Entry Window
The third method is to use the regular financial general journal entry window. This versatile window can be used to record general journals, as well as purchase invoices. This is also helpful if detail isn’t needed and items won’t be assigned to the invoice.
Go to Finance > General Journals, and select DEFAULT
Fill in the following fields (note: amount is a negative since we are in the general journal window).


Click Process > Post and Print.
A debit has been posted to account 60200 (advertising expense) and a credit to 20100 (accounts payable).
An open invoice has also been posted to the vendor ledger that can be selected for payment.

To view the invoice in any of the three examples we just posted, open the vendor card and go to Navigate > History > Ledger Entries.
The invoices posted above are now listed for the vendor:

Dynamics 365 Business Central is that simple! You can see how user-friendly and versatile the interface is from simple examples like these. For more tips and tricks, be sure to join us on November 12, 2019 at 10am Central for a brand new webinar: Tips & Tricks for Dynamics 365 Business Central. It will have something for everyone!
