 How many of you found yourself working on a document and before you know it, the application you are using crashes? You think to yourself, “Oh I hope it saved!”
I’ve lost plenty of documents, countless! It’s the worse feeling in the world; all that work you put in and just like that gone!
Did you know that Microsoft Office 365 has AutoSave and AutoRecover options that you can adjust to your preference? I didn’t know either.
I’m going to walk you through some simple procedures to help you avoid losing all your work when unexpected things happen. It’s quite simple actually, all we have to do is make sure that AutoSave and AutoRecover is turned on. Yep, that’s all.
Here’s what you do:
AutoSave:
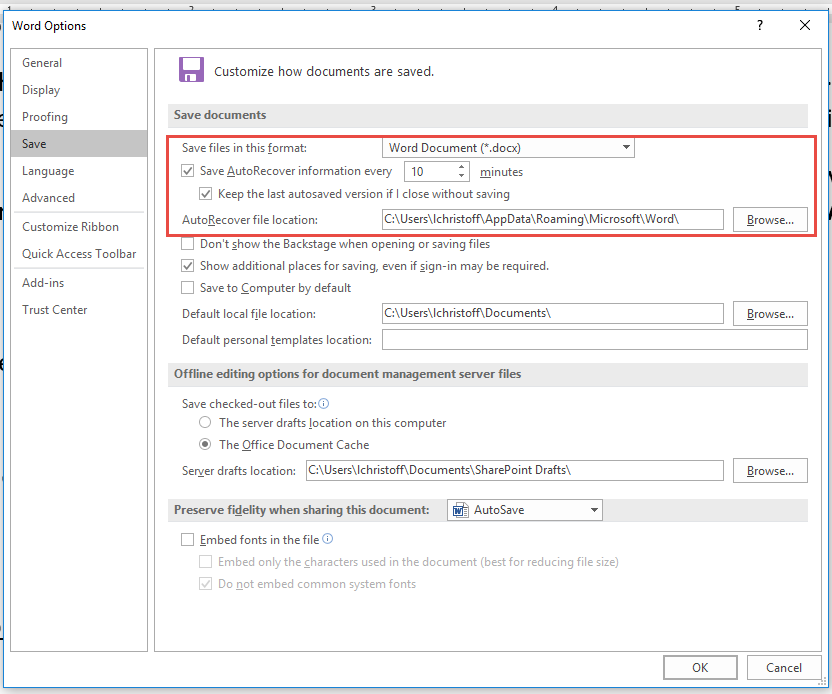
- When in your Word document, go to File Tab > Options Tab > Save Tab

- Verify that the Save AutoRecover information every X minutes box is selected (X = the number of minutes).
- When in Word, Excel, and PowerPoint, make sure the Keep the last autosaved version if I close without saving box is selected.
Important Notes:
- Even with the AutoSave feature enabled, it doesn’t hurt to continue to save frequently. Make sure you don’t lose your latest work and click Ctrl+S often.
- To be extra safe, enter a small number in the minute box, like 5. That way, you’ll never lose more than 5 minutes of work.
AutoRecover:
- AutoRecover saves more than your files. It also saves your workspace.
- Suppose you open several documents in Word and the power goes out. When you restart Word, AutoRecover tries to open your documents again, laid out the way they were before.
Recovering your Office files:
- If you didn’t save your most recent changes when an Office program unexpectedly closed, the Document Recovery task pane automatically opens the next time you open the program so you can get your file back.
- Click the arrow next to the recovered file in the Document Recovery task pane, and choose Open, Save As, or Delete.
