Recently, one of our clients upgraded to Microsoft Dynamics GP 2018 and ran into an issue with a view no longer working. They used a view in a SmartList to show security roles, security resource details, and tasks assigned to each user in a Dynamics GP company. However, after the upgrade, this view no longer populated even after they used the steps provided in the article below to Clear Data to populate the SY09400 Resource Descriptions table.
The View
In 2010, Victoria Yudin wrote an article that describes how to create a SQL view with security resource details. In the article, Victoria also describes how to use the Clear Data Maintenance within Dynamics GP to populate the SY09400 table in SQL, which is the table that contains the system resource details for Dynamics GP
These steps were also mentioned previously in Microsoft KB 951229.
The Problem
As it happens, in Dynamics GP 2016 and Dynamics GP 2018, Clear Data no longer populates all of the system resource information like before. It only populates the resource descriptions in the SY09400 table for Windows, Reports, Views, and Stored Procedures. It does not populate the resource descriptions for other resources such as Series Posting Permissions, SmartList Options, or Tables.
How can you add back the old resource descriptions?
Luckily I had a test installation of Dynamics GP 2010, where I was able to run the Clear Data Maintenance in GP 2010 to populate the SY09400 table with all of the GP 2010 resource descriptions.
I ran the following SQL script in SQL Management Studio for the Dynamics GP 2010 installation and copied the data into Excel. The Excel spreadsheet has all of the resource descriptions except for Windows (SECRESTYPE = 2), Reports (SECRESTYPE = 23), Views (SECRESTYPE = 57), and Stored Procedures (SECRESTYPE = 58).
SELECT * FROM DYNAMICS..SY09400 WHERE SECRESTYPE NOT IN (2, 23, 57, 58)
I highlighted all rows and columns of the results and copied with CTRL+C. Then I went into an empty Excel spreadsheet and clicked CTRL+V to paste the data into Excel. Next, I saved the Excel workbook.
In Dynamics GP 2018, I used the Clear Data Maintenance on the System Resource Descriptions table to populate the SY09400 table. Here are the steps from Victoria’s article:
- Go to Microsoft Dynamics GP > Maintenance > Clear Data
- Click Display on the toolbar and click Physical
- Select System under Series
- Click Security Resource Descriptions under Tables to highlight it and click Insert to add it to the Selected Tables list
- Click OK, then Yes to the pop up message asking you if you’re sure that you want to clear data from the table
- Send the report to the screen, it should report back with ‘No errors found’
Next, I created a new SQL table in the DYNAMICS database in the Dynamcis GP 2018 installation to hold the additional resource descriptions. To do this, I ran the following script.
SELECT * INTO DYNAMICS..CA_ResourceDescriptions from DYNAMICS..SY09400
The script created the new table called, CA_ResourceDescriptions in the DYNAMICS database. It contains all of the resource descriptions for Windows, Reports, Views, and Stored Procedures that are in the table SY09400. I then removed all of the data from the new table using the following SQL script.
DELETE DYNAMICS..CA_ResourceDescriptions
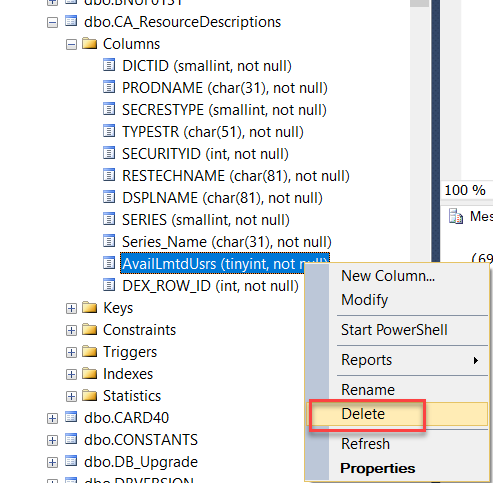
After deleting all of the data, I needed to remove one of the columns from the table which exists in Dynamics GP 2018 but was not present in Dynamics GP 2010. To do this, I clicked the plus signs on the CA_ResourceDescriptions table in the DYNAMICS Database to open the list of columns, then right-click on the AvailLmtdUsrs column and click Delete (note – be sure you are doing this in the new CA_ResourceDescriptions table, not in the SY09400 table).

Next, I will populate the new table with the data from the Excel spreadsheet.
I opened the Excel file I had created from the SY09400 data in Dynamics GP 2010, then highlighted the cells from Cell A2 through Cell J3168 – all cells except those in the header row. Then CTRL+C to copy the data.
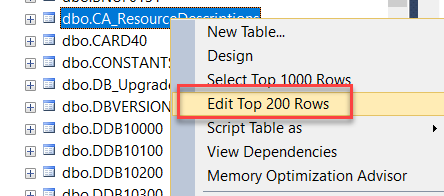
In the SQL Management Studio, in the Dynamics GP 2018 installation, I right-clicked the CA_ResourceDescription table and clicked Edit Top 200 Rows.

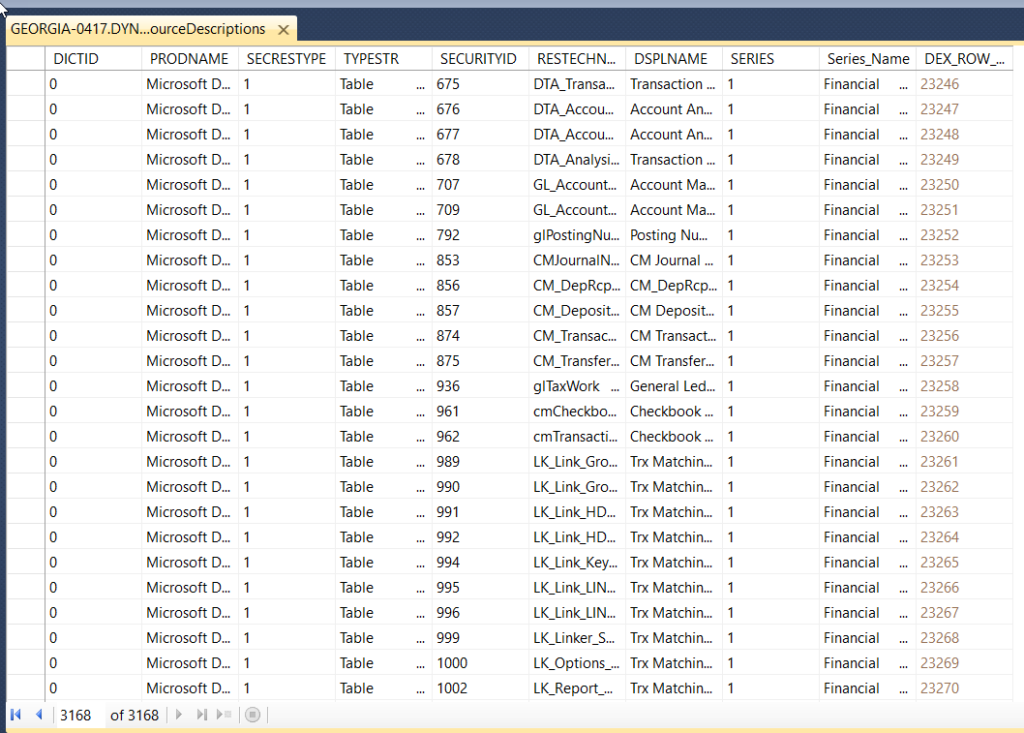
The Query will show 1 row with all NULL values because there is currently no data in the table. Click into the cell in the top left of the headers so that it selects all the information, then right-click and select Paste.

The paste process took a few minutes to complete. It even appeared that it was causing errors, but it did eventually paste all the data into the table. The end result looked like this, with 3168 showing in the number or rows at the bottom of the window.

Now I need to alter the security view that was already in the database because it had been used prior to the upgrade. If you do not already have the view in your system, you can create the view instead of altering it. I used the view that Victoria had shown in her blog, but needed to change it to add in the details of the new table I had created. The view is shown below with the changes highlighted in yellow. Note – notice I created a Union between the SY09400 table and the new CA_ResourcesDescription table.
USE [DYNAMICS]
GO

/****** Object:  View [dbo].[view_Security_Details]    Script Date: 6/21/2018 11:27:34 AM ******/
SET ANSI_NULLS ON
GO

SET QUOTED_IDENTIFIER ON
GO


ALTER VIEW [dbo].[view_Security_Details] as
SELECT DISTINCT
     S.USERID UserID,
     S.CMPANYID CompanyID,
     C.CMPNYNAM CompanyName,
       coalesce(S.SecurityRoleID,'') SecurityRoleID,
     coalesce(T.SECURITYTASKID,'') SecurityTaskID,
     coalesce(TM.SECURITYTASKNAME,'') SecurityTaskName,
     coalesce(TM.SECURITYTASKDESC,'') SecurityTaskDescription,
     coalesce(R.DICTID,'') DictionaryID,
     coalesce(R.PRODNAME,'') ProductName,
     coalesce(R.TYPESTR,'') ResourceType,
     coalesce(R.DSPLNAME,'') ResourceDisplayName,
     coalesce(R.RESTECHNAME,'') ResourceTechnicalName,
     coalesce(R.Series_Name,'') ResourceSeries
FROM  SY10500 S   -- security assignment user role
LEFT OUTER JOIN
     SY01500 C   -- company master
     ON S.CMPANYID = C.CMPANYID
LEFT OUTER JOIN
     SY10600 T  -- tasks in roles
ON S.SECURITYROLEID = T.SECURITYROLEID
LEFT OUTER JOIN
     SY09000 TM  -- tasks master
ON T.SECURITYTASKID = TM.SECURITYTASKID
LEFT OUTER JOIN
     SY10700 O  -- operations in tasks
ON T.SECURITYTASKID = O.SECURITYTASKID
LEFT OUTER JOIN
     (select DICTID, PRODNAME, SECRESTYPE, TYPESTR, SECURITYID, RESTECHNAME, DSPLNAME, SERIES, Series_Name from SY09400
     UNION
     select DICTID, PRODNAME, SECRESTYPE, TYPESTR, SECURITYID, RESTECHNAME, DSPLAME, SERIES, Series_Name from CA_ResourceDescriptions) R  -- resource descriptions
     ON R.DICTID = O.DICTID AND O.SECRESTYPE = R.SECRESTYPE
     AND O.SECURITYID = R.SECURITYID

GO
Now run the Grant Select statement on the view so that you can use it in the SmartList.
GRANT SELECT ON view_Security_Details TO DYNGRP
None of the column information is changed from the original view, so if a SmartList is already created using this view, nothing else needs to be done. The SmartList will show all of the resource description information from both the SY09400 table and the CA_ResourceDescriptions table.
If you did not already have a SmartList to show the security details, you can add one in either SmartList Builder or SmartList Designer using the View view_Security_Details.
Not a SQL guru? If you have questions or need some assistance, visit our support page for more help.
