Save time upgrading your hard drive. Here’s how to upgrade your drive C: with more space, without having to reinstall Windows from scratch.
Items that you’ll need
- SSD drive to replace the one you have installed.
- USB thumb drive
- USB drive with enough space to back up your entire C: drive.
- Software: Macrium Reflect
- Software: EaseUS Partition Master
Step 1
Have a good backup. This would be a good time to validate whatever you might be using for backups by making sure that you can restore a test file or two successfully.
Step 2
Download and install the following software packages. There are free editions of each, but both are well worth the cost.
- Macrium Reflect
- EaseUS Partition Master
Step 3
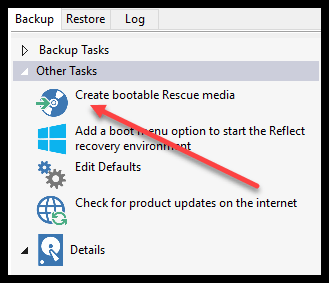
Create a boot USB.
After creating a USB boot thumb drive is it critical that you test it. Make sure that your computer’s BIOS settings are allowing for a boot sequence to include the USB first.
Step 4
Once you’ve verified that you can boot off a USB drive, reboot your computer normally. Open Macrium Reflect and backup your C: drive. Be sure to select ‘Image this disk’. Depending on your hardware a 500 gig drive can take a few hours.
Step 5
After you have completed a full image backup, shutdown your computer, remove the current C: drive, and install the new drive.
Step 6
Now it’s time to start up your computer from the USB thumb drive that you created. You will be taken to the Macrium menu where you will see the restore option. Again, depending on your hardware, the restore process could take a few hours.
Step 7
After the restore is completed, remove the USB thumb drive and boot your computer normally. Your system should come up as it did with all your data from drive C:. If for any reason this fails, you still have the old drive that you could safely re-install.
Step 8
Your final step is to ‘Expand’ your partition to recognize the new available space. EaseUS Partition Master should already be installed from step 2. Run the partition manager to expand your partition to use the unallocated free space.
Note: that this can be a little tricky. You’ll need to make sure the existing partition and the new unallocated partition are next to each other.
This process could take 3-6 hours, but most of that time is idle time waiting for backups and restores to finish. Your actual attention will only take about 10 minutes, so this can be a pretty attractive method -vs- installing everything manually.
Warning – please make extra sure you have a reliable backup plan outside of this entire process. It’s nice to have a plan B in case your image backup didn’t work and you accidently drop your current hard drive on floor….
If you have questions or need some assistance, visit our support page for more help.


