We get a lot of questions in regards to check printing. Here are four helpful tips:
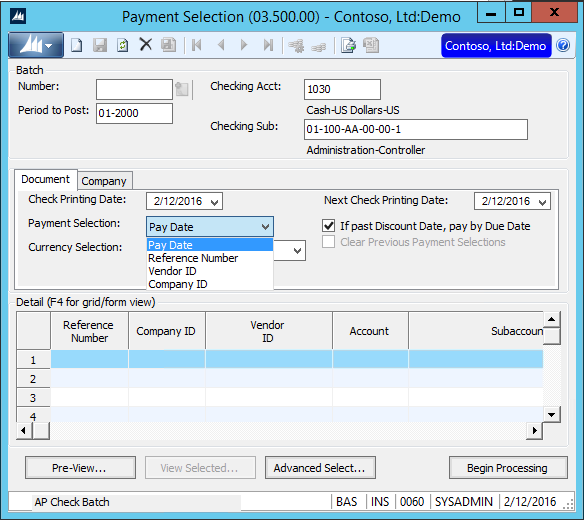
- The AP Payment Selection screen is a utility to populate the values in the AP Edit/Select Documents for Payment screen. Use the “Payment Selection” screen when you are trying to select documents by Pay Date, Batch Nbr, or other criteria. Simply choose your criteria in the “Payment Selection” field or using the Advanced Select and entering your restricted values or date. Then click the “Begin Processing” button:
 This process will create a batch that can still be modified in the AP Edit/Select Documents for Payment screen. Once created, specific documents can be removed or payment amounts changed to short pay the document:
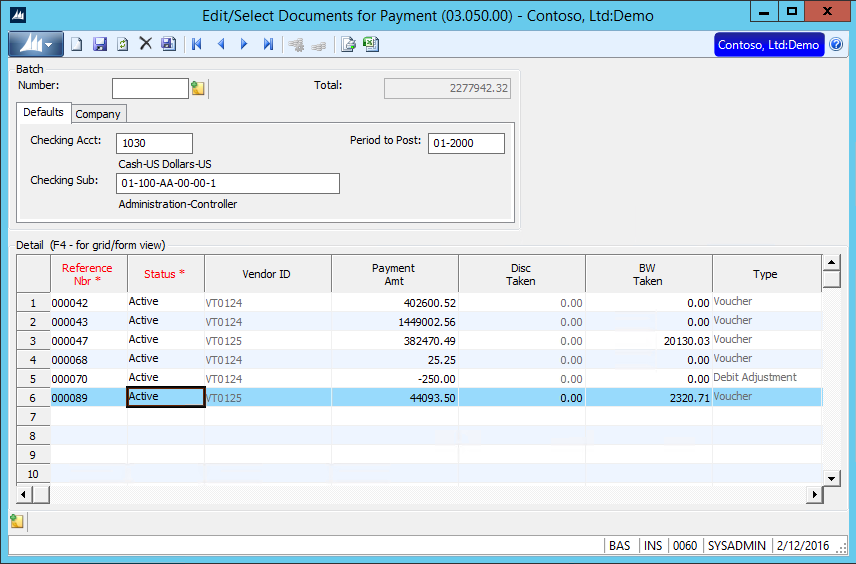 However, you can skip the AP Payment Selection screen altogether, and go straight to the AP Edit/Select Documents for Payment screen. This screen is a great way to select just a few specific documents. Simply press F3 in the “Reference Nbr” field and select documents to pay. Then save the batch. You can also unselect all selected documents by deleting the entire batch from this screen.
- Run the Check Preview Report to view your selections. If multiple selection batches have been created, this report will sort by batch number. It will tell you what is about to print:

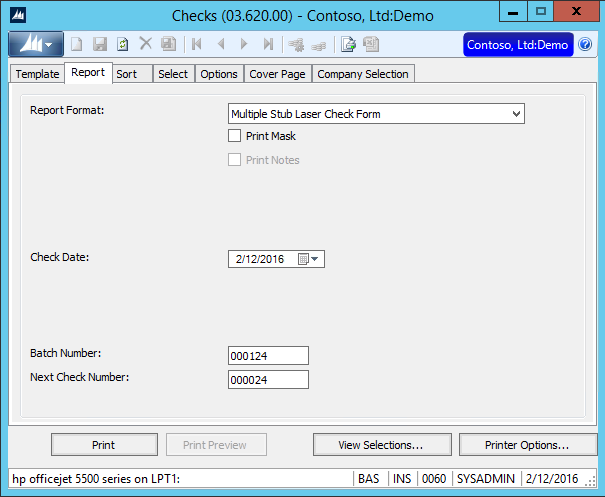
- When printing checks, the “Next Check Number” will appear AFTER you enter the “Batch Nbr” from above. You can click on the “View Selections” button to view the selected documents. Also, it’s possible to default the “Report Format” that you typically use, like the Multiple Stub Laser Check Form:
- Once the checks have completed printing, the AP Check Update (Post) screen will pop up. This is your last chance to verify the “Period to Post,” before releasing the check batch:
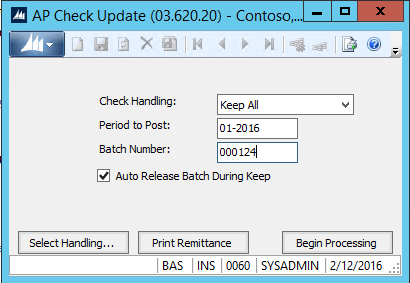
The Check Handling Options are explained here:

- Select “Keep All” if the all the checks printed perfectly. Correct numbers, correct alignment, etc. This will release the check batch and update AP and the vendor history.
- Select “Delete All” if you want to re-use the check numbers, as if the check batch never printed. For example, if you forgot to put check stock in. The documents stay selected, and you can go right back to the Checks report and select the same batch and print with the same check numbers.
- Select “Void All” if you want to mark all checks as voided in the system. For example, you put the check stock in, but upside down, or there was a bad paper jam. The documents will no longer stay selected, but can be re-selected to pay with new check numbers.
- Select “Selected By Check” if you want to choose different options for each check. You can then click on the “Select Handling” button and mark to Void one check, Keep one check, Delete one check, etc., depending on what happened.
Don’t miss our upcoming webinar on June 21, 2018 for a first-hand look at Dynamics SL 2018. Reserve your spot here.
If you have questions or need some assistance, visit our support page for more help.
